Okay...
Since the wastegate shat itself, and fked my clutch lines, I've decided to fix it all myself...
Plan of attack is:
Stage 1 Fix sh*t
- Fill Clutch cylinder with fluid
- Find out if its got a leak, or is just being evaporated by wastegate/turbo
- Remove Front bar
- Remove Waste gate
- Remove piping + BOV
- Remove Turbo
- Isolate Leak in Lines (If present)
- Replace necesary lines with braided lines
- Replace Wastegate with Tial model (44mm)
- Re-assemble
Budget:
Clutch Fluid - $ Had lying Around
Braided Lines $150??
Wastegate $600
Total $750
Stage 2 Make fast
- Upgrade injectors to minimum 600cc (prefer 800s)
- Remove clutch
- Get clutch rebuilt and strengthened
- Re-Install
- Bump boost to 20psi and Re-Tune
Budget:
Injectors $200
Clutch Build $250
Tune $400
Total $850
Tage 1 +2 Total $1600
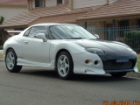
Sams Turbo FTO: Fixing crap (Wastegate, Clutch lines, etc)
Moderators: IMC, Club Staff
-
FtoSam

- Oldtimer
- Posts: 3924
- jedwabna poszewka promocja
- Joined: Wed Jul 13, 2005 5:00 pm
- Location: Brisbane West
- Contact:
Sams Turbo FTO: Fixing crap (Wastegate, Clutch lines, etc)

If you need good deal on photography, let me know.
-
FtoSam
- Oldtimer
- Posts: 3924
- Joined: Wed Jul 13, 2005 5:00 pm
- Location: Brisbane West
- Contact:
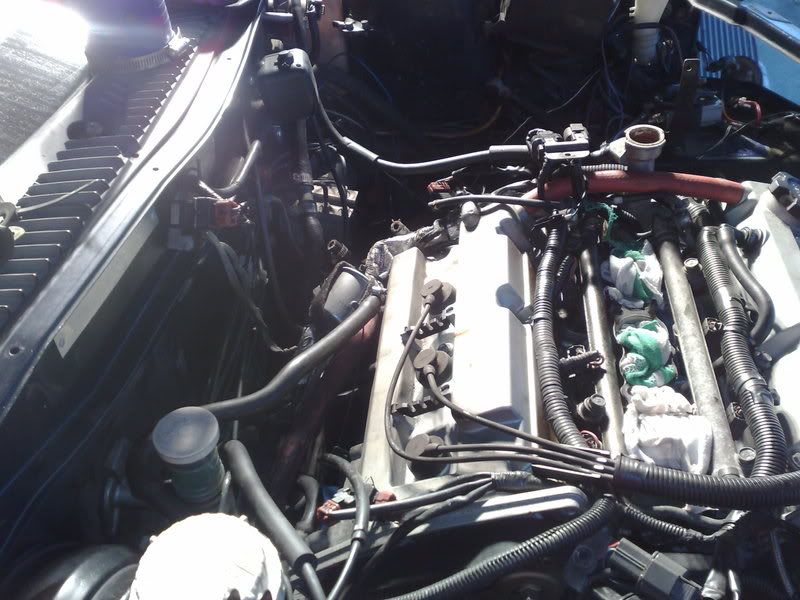
Started work on getting the turbo out...
After filling the clutch fluid and giving a couple of pumps, it all dissapeared and we saw some leaking out the bottom of the car..
So set on my way...
Removed front bar - 15 mins (Have become an expert at this
Have removed all piping (Absolute mission) - 3 hours
Also removed BOV (5 mins)
Removed wastegate - 30 mins
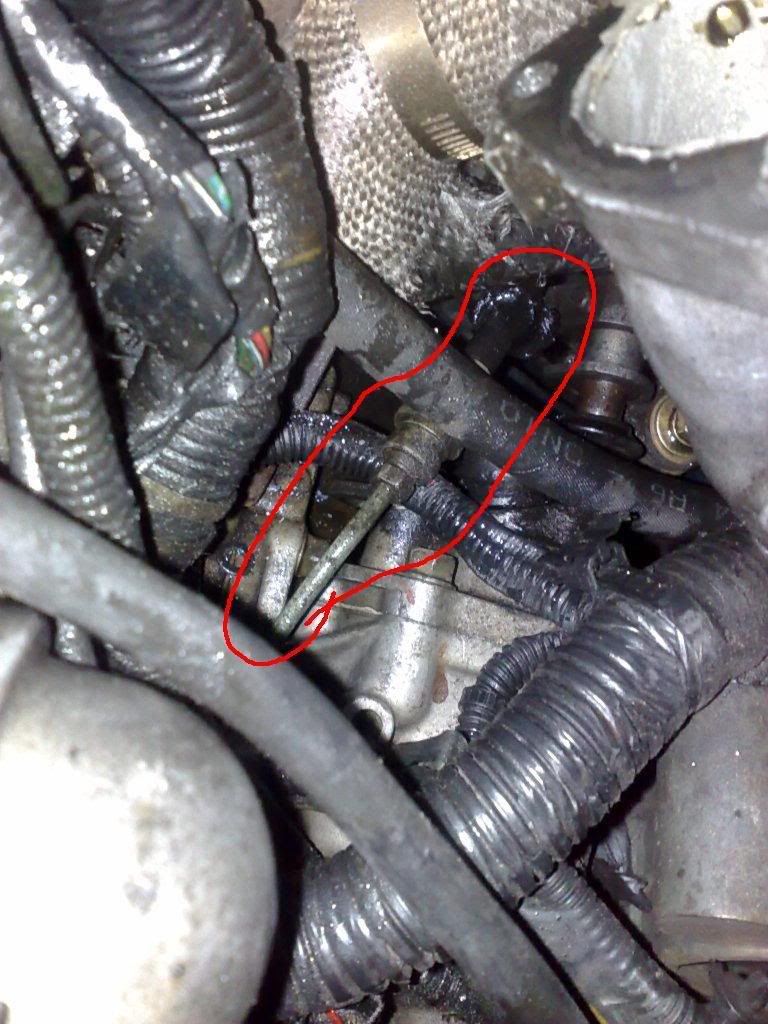
found the leak - 15 mins
Thats all for tonight... will get the rest of the turbo out tomorow night, which should give me plenty of access to the clutch line.. then remove that and take it somewhere to get a braided duplicate made up..
Pics:
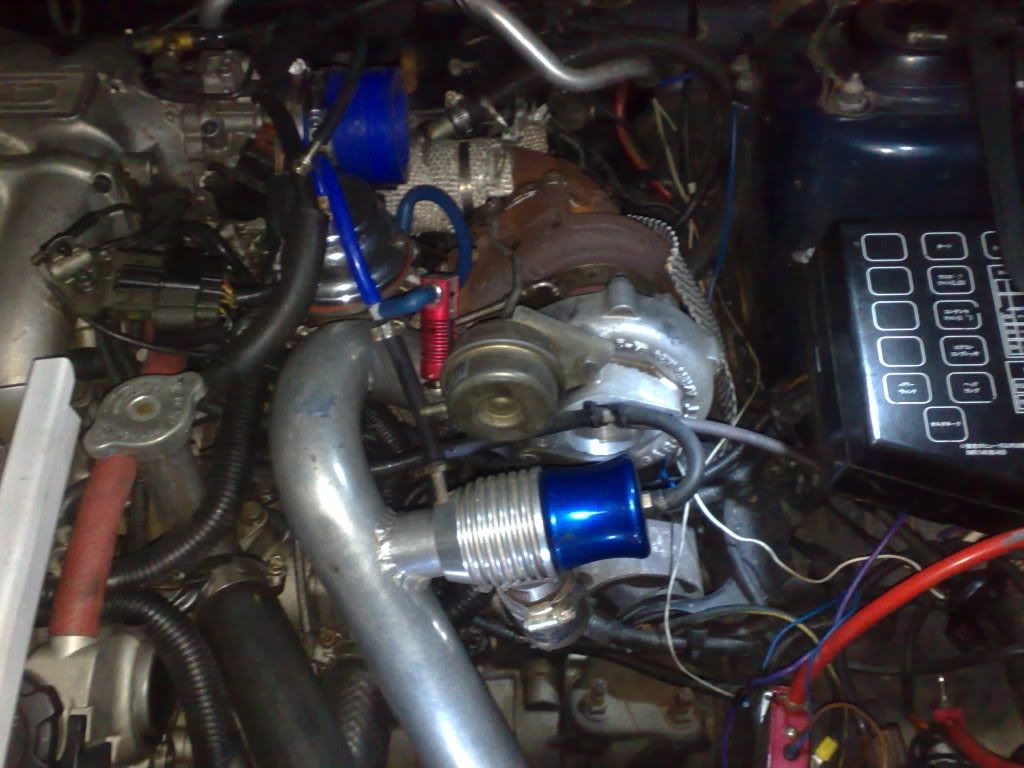
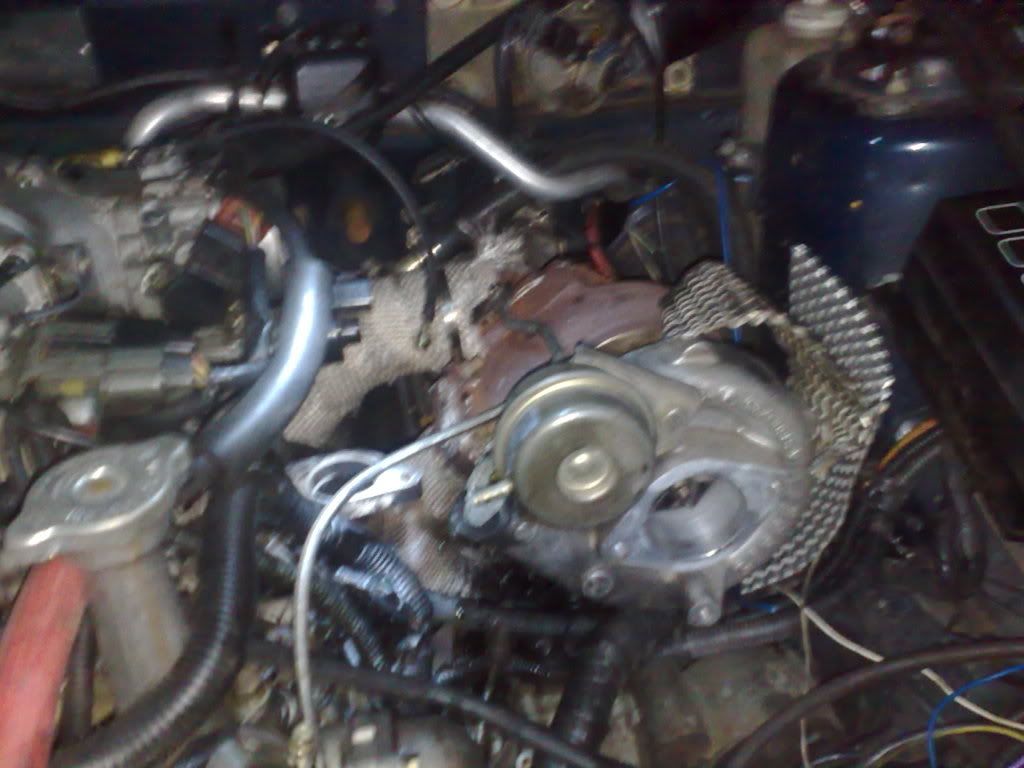
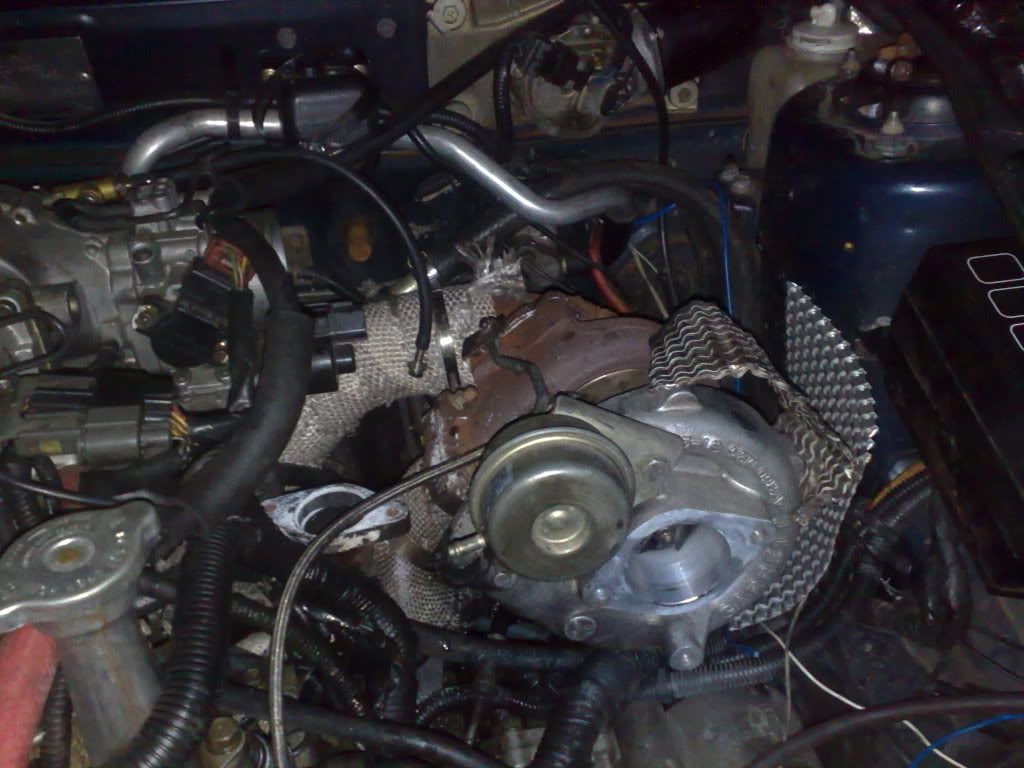
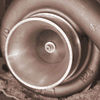
And this is the culprit! Turbo has burnt through outer layer by the looks...

After filling the clutch fluid and giving a couple of pumps, it all dissapeared and we saw some leaking out the bottom of the car..
So set on my way...
Removed front bar - 15 mins (Have become an expert at this
Have removed all piping (Absolute mission) - 3 hours
Also removed BOV (5 mins)
Removed wastegate - 30 mins
found the leak - 15 mins
Thats all for tonight... will get the rest of the turbo out tomorow night, which should give me plenty of access to the clutch line.. then remove that and take it somewhere to get a braided duplicate made up..
Pics:
And this is the culprit! Turbo has burnt through outer layer by the looks...
If you need good deal on photography, let me know.
-
FtoSam
- Oldtimer
- Posts: 3924
- Joined: Wed Jul 13, 2005 5:00 pm
- Location: Brisbane West
- Contact:
Progress:
Clutch line finished... Had to be done in special teflon coated braid (i.e. twice the $$)
but got done for $95..
Also just bought a 40mm HKS wastegate for a cracker of a price!!! ($170 delivered) RRP would have to be $500-$800
Pick up the lines when i get a chance (Prob tomorow) and gate should be here monday..
Just trying to source some bigger injectors while im going...
Anyone know if Evo injectors will fit?
Once its all in, we'll go for another tune and try for the 350hp mark...
If you need good deal on photography, let me know.
-
FtoSam
- Oldtimer
- Posts: 3924
- Joined: Wed Jul 13, 2005 5:00 pm
- Location: Brisbane West
- Contact:
wow.... been away for a while with family business...
now i've changed jobs and am moving house within a week...
So after trying to find a piece of clutch line, i decided to try my luck getting one made on the cheap to at least make the car moveable...
$19 later i had what i needed...
Clutch is back in working order...
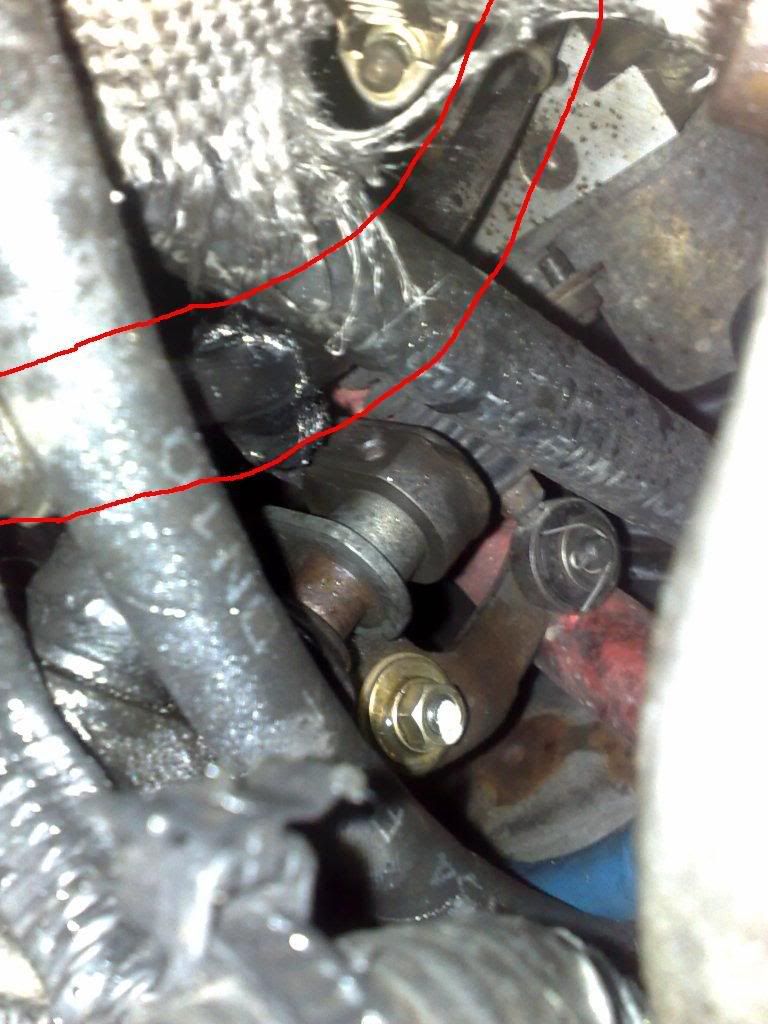
Also, found the real problem with the car....
On the up pipe where it splits to a Y piece for the wastegate, a weld has broken leaving a massive gap... Blowing hot exhaust gas all over the old rubber clutch line...
So needing new piping now..
But first things first, I'll be towing the fto to my new place where it will sit in the shed while being worked on...
Will keep you guys posted, but now i have a work shed and things are back to normal, she should be back on the road with more power very soon..
now i've changed jobs and am moving house within a week...
So after trying to find a piece of clutch line, i decided to try my luck getting one made on the cheap to at least make the car moveable...
$19 later i had what i needed...
Clutch is back in working order...
Also, found the real problem with the car....
On the up pipe where it splits to a Y piece for the wastegate, a weld has broken leaving a massive gap... Blowing hot exhaust gas all over the old rubber clutch line...
So needing new piping now..
But first things first, I'll be towing the fto to my new place where it will sit in the shed while being worked on...
Will keep you guys posted, but now i have a work shed and things are back to normal, she should be back on the road with more power very soon..
If you need good deal on photography, let me know.
-
FtoSam
- Oldtimer
- Posts: 3924
- Joined: Wed Jul 13, 2005 5:00 pm
- Location: Brisbane West
- Contact:
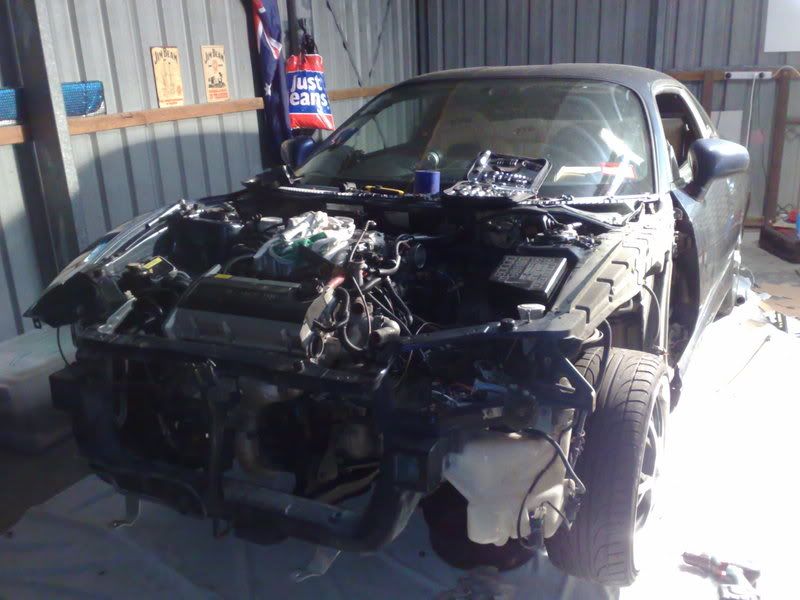
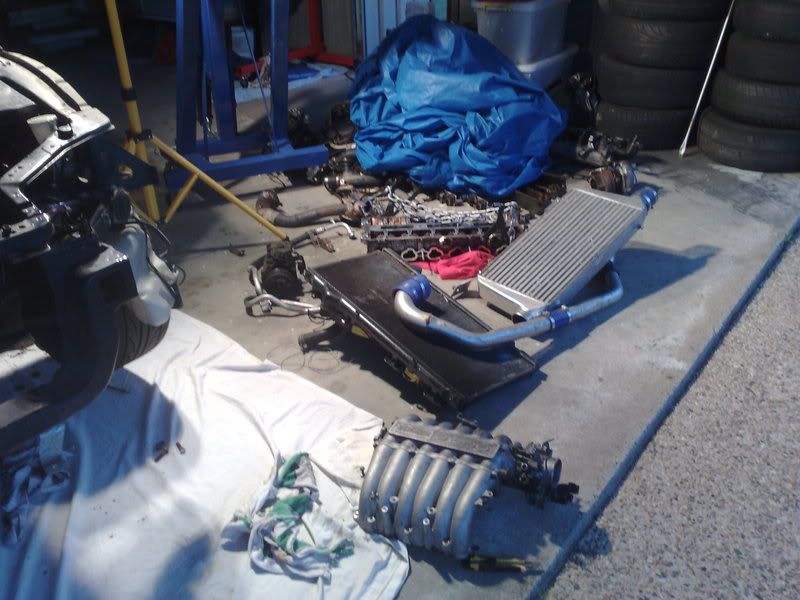
Alright... IN the new place now, so i has a shed to work in...
a few piccies of the damage i did today....
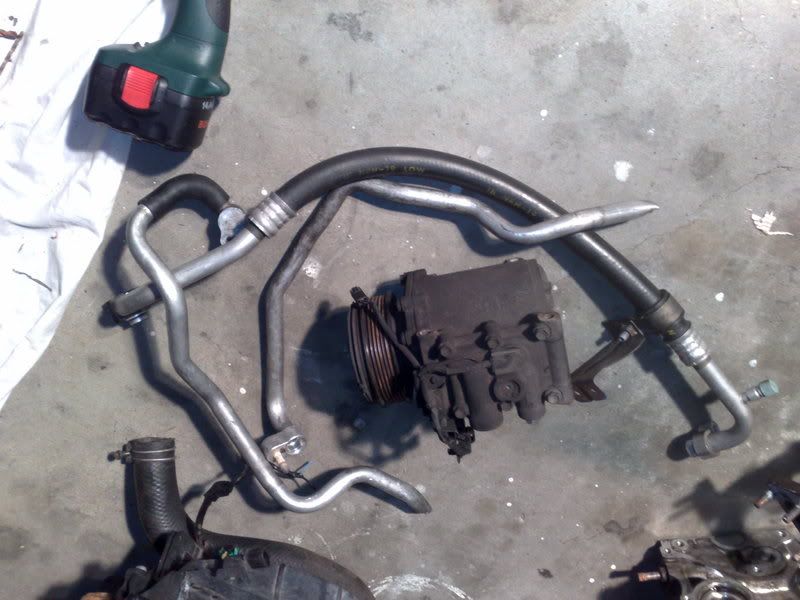
Have removed all the air con lines permanently. (At least 10kg here alone, plus less load on the engine)
Also took out the turbo and the pipes... (Holy sh*t.... what a fkin mission!!!)
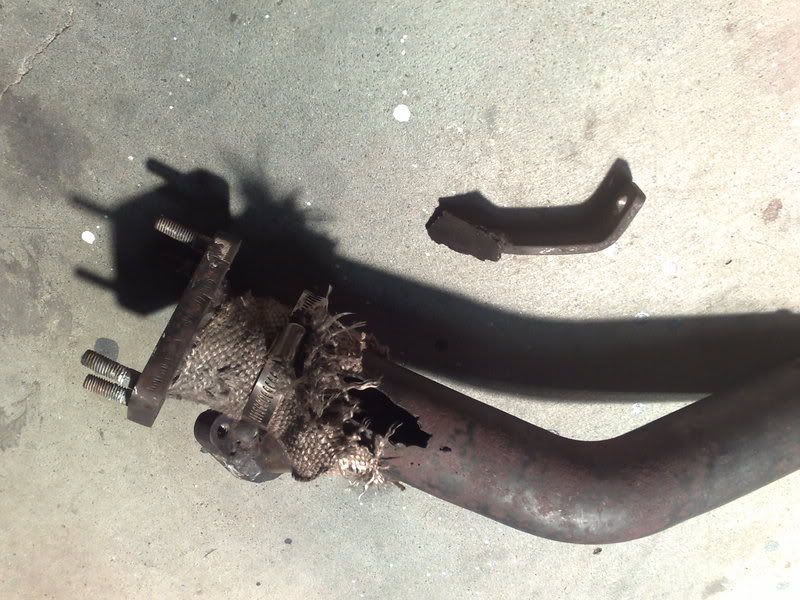
Here is the damage on the up pipe. What looks to have happened is the engine twisted through torque, and bent the pipe enough to snap the weld of the bracket holding the pipe to the chassis...
Will be doing a lot more work over the next couple of weeks including:
bigger waste gate,
injectors,
belt work,
full servicing,
newer bigger up and down pipes
engine bay scrub,
re-wiring of the entire engine,
relocation of the fuse box to the glove box,
upgrading of the earthing straps,
panel beating some dints out,
replacing a rear seized caliper,
removing the internal heater core matrix and all heater/ air con lines,
installing demister unit,
re-wire audio system,
fix angel eyes,
fix delamination,
install eye lids, etc....
I will be making DIYs for almost everything.... so hopefully to make things easier for others...
Oh and if anyone needs specs of any turbo gear while its out of the car for a week or two, let me know...
a few piccies of the damage i did today....
Have removed all the air con lines permanently. (At least 10kg here alone, plus less load on the engine)
Also took out the turbo and the pipes... (Holy sh*t.... what a fkin mission!!!)
Here is the damage on the up pipe. What looks to have happened is the engine twisted through torque, and bent the pipe enough to snap the weld of the bracket holding the pipe to the chassis...
Will be doing a lot more work over the next couple of weeks including:
bigger waste gate,
injectors,
belt work,
full servicing,
newer bigger up and down pipes
engine bay scrub,
re-wiring of the entire engine,
relocation of the fuse box to the glove box,
upgrading of the earthing straps,
panel beating some dints out,
replacing a rear seized caliper,
removing the internal heater core matrix and all heater/ air con lines,
installing demister unit,
re-wire audio system,
fix angel eyes,
fix delamination,
install eye lids, etc....
I will be making DIYs for almost everything.... so hopefully to make things easier for others...
Oh and if anyone needs specs of any turbo gear while its out of the car for a week or two, let me know...
If you need good deal on photography, let me know.
-
aza013
- NSW Coordinator
- Posts: 9087
- Joined: Mon Mar 26, 2007 5:00 pm
- Location: The Shire
- Contact:
-
FtoSam
- Oldtimer
- Posts: 3924
- Joined: Wed Jul 13, 2005 5:00 pm
- Location: Brisbane West
- Contact:
Yeah i hope so.
Goes to show to do it right the first time... but then again the kit i have was never intended to run more than about 210hp atw... and i'm currently pushing over 300hp... and still on 10psi..
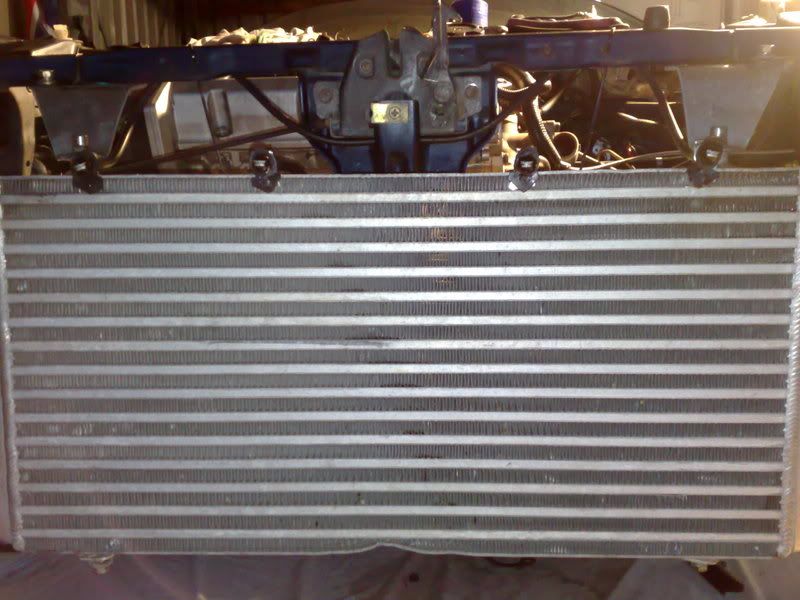
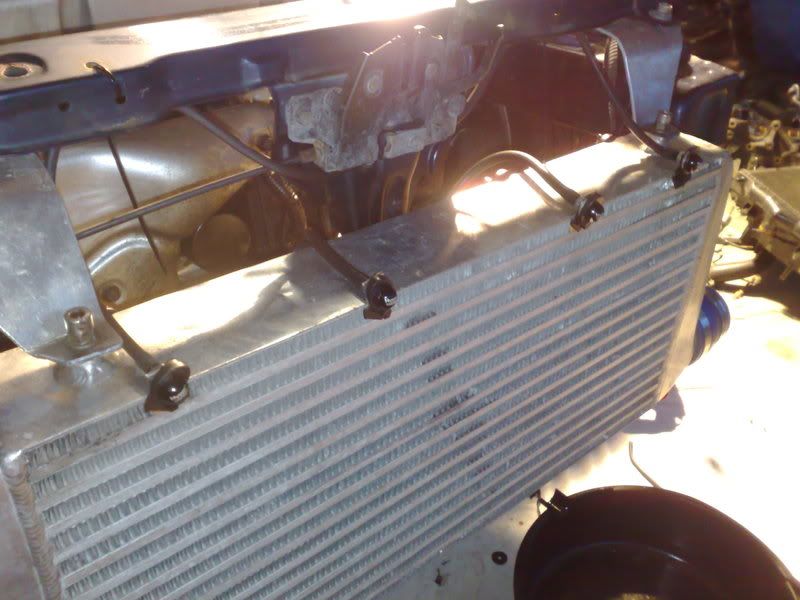
I'm getting my entire intake manifold remade to intake from the drivers side, getting a new intercooler and re-doing all piping except the exhaust...
Hopefully most of it will be done in 2.5 or 3" pipe... so should flow well...
Goes to show to do it right the first time... but then again the kit i have was never intended to run more than about 210hp atw... and i'm currently pushing over 300hp... and still on 10psi..
I'm getting my entire intake manifold remade to intake from the drivers side, getting a new intercooler and re-doing all piping except the exhaust...
Hopefully most of it will be done in 2.5 or 3" pipe... so should flow well...
If you need good deal on photography, let me know.
-
Bennoz
- National President
- Posts: 23668
- Joined: Fri Jan 21, 2005 6:00 pm
- Location: Sydney
- Contact:
-
I8A4RE
- QLD Coordinator
- Posts: 9594
- Joined: Mon Aug 28, 2006 5:00 pm
- Location: BOOSTIN in front of you
- Contact:
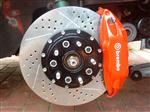
make sure you use stainless for your up and down pipes not mild steel
CHRISTIANITY: The belief that a cosmic Jewish Zombie who was his own father can make you live forever if you symbolically eat his flesh and telepathically tell him you accept him as your master, so he can remove an evil force from your soul that is present in humanity because a rib-woman was convinced by a talking snake to eat from a magical tree...
-
FtoSam
- Oldtimer
- Posts: 3924
- Joined: Wed Jul 13, 2005 5:00 pm
- Location: Brisbane West
- Contact:
YEah a polly mount would be good...
And im getting it all done in stainless..
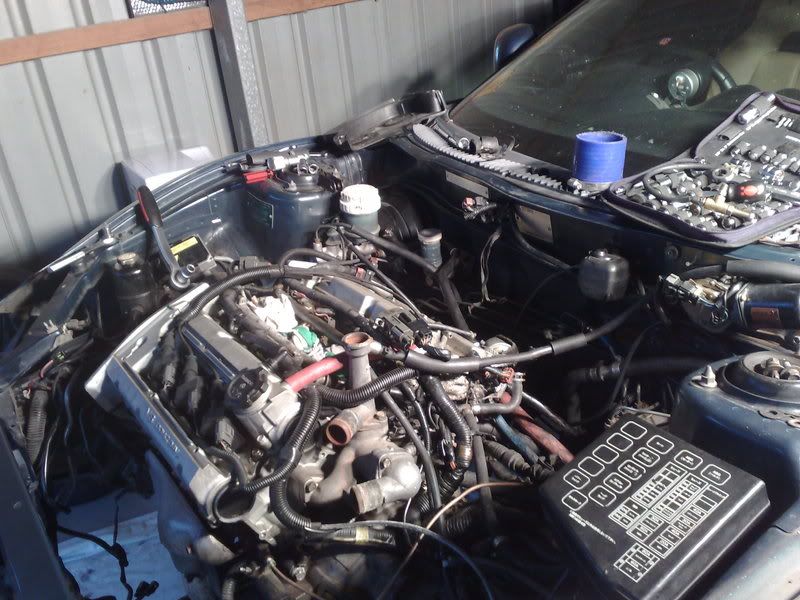
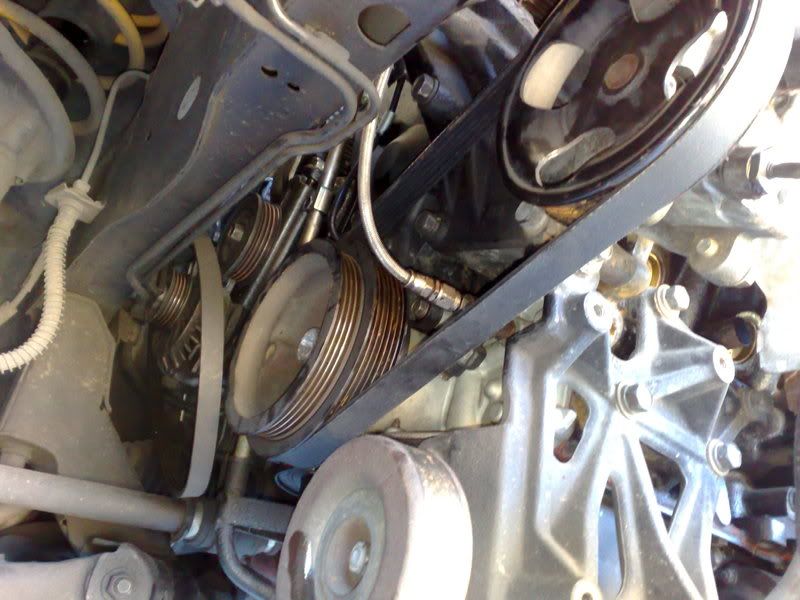
Here are some more progress shots of the work i did while i had a spare hour or two this morning...
Air con system completely removed so have sourced a shorter belt.
This has given me bucket loads more room. a lot less weight... less load on the engine.. and because i no longer am using the tensioner, which hangs down very low, i have better front ground clearance...
Bitch to get the belt on (had to soak in boiling water and almost fill the swear jar) but looks to be worth it (till it needs changing anyway... lol)
Loving having the garage....
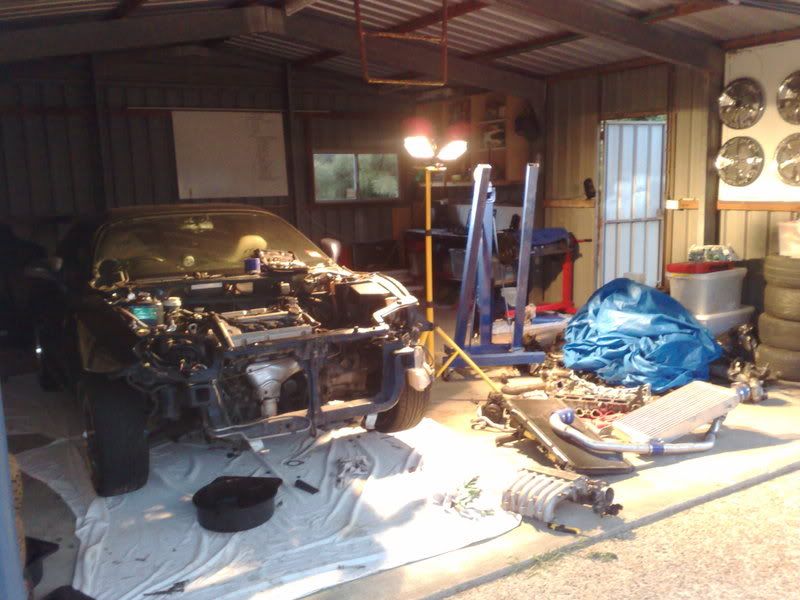
pics:
Garage in a mess:

Intake manifold off, Ready for modification:
A/c Pulley removed: (bracket and tensioner will be removed tomorrow)

New shortened belt installed:
And im getting it all done in stainless..
Here are some more progress shots of the work i did while i had a spare hour or two this morning...
Air con system completely removed so have sourced a shorter belt.
This has given me bucket loads more room. a lot less weight... less load on the engine.. and because i no longer am using the tensioner, which hangs down very low, i have better front ground clearance...
Bitch to get the belt on (had to soak in boiling water and almost fill the swear jar) but looks to be worth it (till it needs changing anyway... lol)
Loving having the garage....
pics:
Garage in a mess:
Intake manifold off, Ready for modification:
A/c Pulley removed: (bracket and tensioner will be removed tomorrow)
New shortened belt installed:
If you need good deal on photography, let me know.
-
I8A4RE
- QLD Coordinator
- Posts: 9594
- Joined: Mon Aug 28, 2006 5:00 pm
- Location: BOOSTIN in front of you
- Contact:
So how are you going to tension the new belt?
CHRISTIANITY: The belief that a cosmic Jewish Zombie who was his own father can make you live forever if you symbolically eat his flesh and telepathically tell him you accept him as your master, so he can remove an evil force from your soul that is present in humanity because a rib-woman was convinced by a talking snake to eat from a magical tree...
-
FtoSam
- Oldtimer
- Posts: 3924
- Joined: Wed Jul 13, 2005 5:00 pm
- Location: Brisbane West
- Contact:
wasnt easy....
Undid some of the bolts on the power steering pump... sat the belt in boiling water to expand it...
then pryed it on... tok a lot of effort to get it on... then it shrunk to normal size and had tension... then we tightened up the pump again... she ended up perfect...
Undid some of the bolts on the power steering pump... sat the belt in boiling water to expand it...
then pryed it on... tok a lot of effort to get it on... then it shrunk to normal size and had tension... then we tightened up the pump again... she ended up perfect...
If you need good deal on photography, let me know.
-
Bennoz
- National President
- Posts: 23668
- Joined: Fri Jan 21, 2005 6:00 pm
- Location: Sydney
- Contact:
-
FtoSam
- Oldtimer
- Posts: 3924
- Joined: Wed Jul 13, 2005 5:00 pm
- Location: Brisbane West
- Contact:
-
FtoSam
- Oldtimer
- Posts: 3924
- Joined: Wed Jul 13, 2005 5:00 pm
- Location: Brisbane West
- Contact:
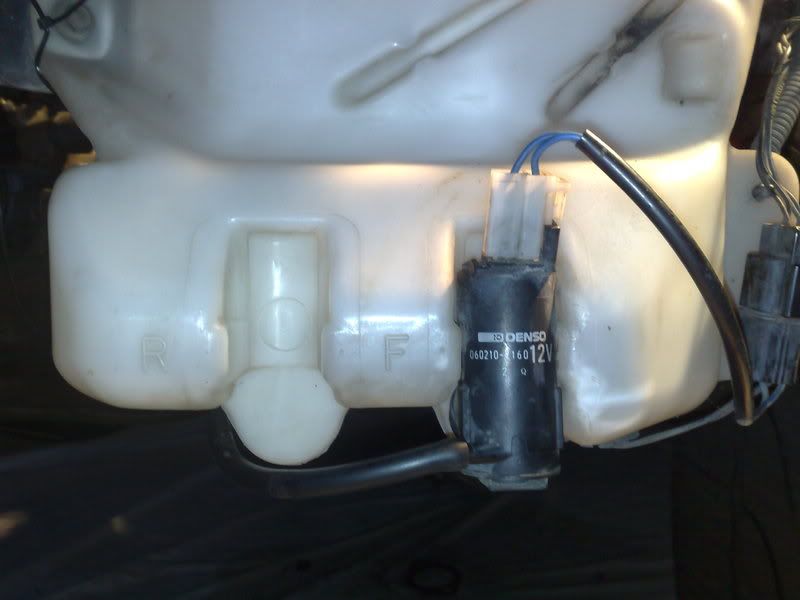
Had the day off work today... So went and bought some hoses and misters and built a water spray kit for the intercooler..
Oh and i also took off the a/c bracket and tensioner... weighed a heap!
Tomorrow i'll be buying a second pump to run the system instead of the main one...
Notice the second pump holder already in the reservoir?
Oh and i also took off the a/c bracket and tensioner... weighed a heap!
Tomorrow i'll be buying a second pump to run the system instead of the main one...
Notice the second pump holder already in the reservoir?
If you need good deal on photography, let me know.