I've done a DIY respray and colour change

Bodykits, Interior modifications, Rice Products, anything that is for looks

Moderators: IMC, Club Staff

Post Reply
Rob Furniss
Oldtimer
Posts: 1394
jedwabna poszewka promocja
Joined: Wed Jan 19, 2011 11:32 pm
Location: Perth
Contact:

I've done a DIY respray and colour change

Post by Rob Furniss »

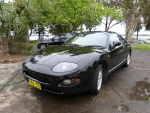
Not perfect but not bad for my first full respray and i'm really glad that I did it as the bodywork has been bad since I bought the car.
Was Scotia white before.

Image
Image
Image
I had already started peeling off the tape when I took the pics, didn't paint it like that.

I'll be cutting it in a couple of days to smooth it out.
Paint cost me less than $300, it's Toyota Voodoo Blue
User avatar
bjk
Totes
Posts: 5746
Joined: Tue Oct 04, 2011 1:34 pm
Location: Adelaide

Re: I've done a DIY respray and colour change

Post by bjk »

I see you've gone the Vortex rear bar! I'll withhold judgement until it's totally complete, but props for giving it a shot yourself, I'd not be as brave lol.

Did the rear left quarter shape up alright?
POWERED BY #TIMKNOTTMOTORSPORT: 2013-2016
Image Image Image Image
User avatar
Sahin
HULK
Posts: 5518
Joined: Wed Oct 05, 2011 10:38 pm
Location: Up to me nuts in boys guts

Re: I've done a DIY respray and colour change

Post by Sahin »

Wtf
Rob Furniss
Oldtimer
Posts: 1394
Joined: Wed Jan 19, 2011 11:32 pm
Location: Perth
Contact:

Re: I've done a DIY respray and colour change

Post by Rob Furniss »

bjk wrote: Sun May 13, 2018 11:55 pm I see you've gone the Vortex rear bar! I'll withhold judgement until it's totally complete, but props for giving it a shot yourself, I'd not be as brave lol.

Did the rear left quarter shape up alright?
Brave? It was that bad before I thought what the hell, and I couldn't justify the cost of getting it done by a pro, I think it will buff up fine.
Colour is a bit bright I suppose but I like it, i'll get some more pics up later in the week.

Rear left:
Rob Furniss
Oldtimer
Posts: 1394
Joined: Wed Jan 19, 2011 11:32 pm
Location: Perth
Contact:

Re: I've done a DIY respray and colour change

Post by Rob Furniss »

Image
Image
Not perfect, but better and it's not really a great picture.
User avatar
bjk
Totes
Posts: 5746
Joined: Tue Oct 04, 2011 1:34 pm
Location: Adelaide

Re: I've done a DIY respray and colour change

Post by bjk »

A lot better I'd say! Better than it being written off at any rate
POWERED BY #TIMKNOTTMOTORSPORT: 2013-2016
Image Image Image Image
Rob Furniss
Oldtimer
Posts: 1394
Joined: Wed Jan 19, 2011 11:32 pm
Location: Perth
Contact:

Re: I've done a DIY respray and colour change

Post by Rob Furniss »

Body shop wanted 4K just for that panel (replacement not beating), don't know how they price things up and get to 4K.

My daughter said this morning - someone had the Lorax FTO, now you have the Smurf.
User avatar
bjk
Totes
Posts: 5746
Joined: Tue Oct 04, 2011 1:34 pm
Location: Adelaide

Re: I've done a DIY respray and colour change

Post by bjk »

This will have to be Smurf #2, there's already been one. :P

What's the bump on the end of the sideskirt BTW?
POWERED BY #TIMKNOTTMOTORSPORT: 2013-2016
Image Image Image Image
Rob Furniss
Oldtimer
Posts: 1394
Joined: Wed Jan 19, 2011 11:32 pm
Location: Perth
Contact:

Re: I've done a DIY respray and colour change

Post by Rob Furniss »

bjk wrote: Mon May 14, 2018 1:05 pm This will have to be Smurf #2, there's already been one. :P

What's the bump on the end of the sideskirt BTW?
I was just trying to make it look a bit different so I made something, didn't quite turn out how I envisaged but I don't mind it. Not a good look?
Rob Furniss
Oldtimer
Posts: 1394
Joined: Wed Jan 19, 2011 11:32 pm
Location: Perth
Contact:

Re: I've done a DIY respray and colour change

Post by Rob Furniss »

Image
Image
Image
User avatar
mezje
Mechanic
Posts: 520
Joined: Wed Mar 11, 2015 12:03 am

Re: I've done a DIY respray and colour change

Post by mezje »

Need some dry photos, is there any clear on it? doesn't look too bad
Rob Furniss
Oldtimer
Posts: 1394
Joined: Wed Jan 19, 2011 11:32 pm
Location: Perth
Contact:

Re: I've done a DIY respray and colour change

Post by Rob Furniss »

No clear on it yet, i've got a bit of orange peel and i'm going to cut it which should sort that (hopefully that's the right thing to do) but it's not bad.
Do I definitely need to put clear on? i'm a bit scared now that i'm at this stage.
User avatar
mezje
Mechanic
Posts: 520
Joined: Wed Mar 11, 2015 12:03 am

Re: I've done a DIY respray and colour change

Post by mezje »

Rob Furniss wrote: Tue May 15, 2018 3:50 pm No clear on it yet, i've got a bit of orange peel and i'm going to cut it which should sort that (hopefully that's the right thing to do) but it's not bad.
Do I definitely need to put clear on? i'm a bit scared now that i'm at this stage.
You can kinda tell from the pics it doesn't have clear, looks kinda 'flat' to me, hard to explain. I think clear would make it look better personally.
Rob Furniss
Oldtimer
Posts: 1394
Joined: Wed Jan 19, 2011 11:32 pm
Location: Perth
Contact:

Re: I've done a DIY respray and colour change

Post by Rob Furniss »

It will look better when i've machine cut and polished it, well it did when I was practicing, but i'm wondering if I need clear to protect it or if I can get away without it.
User avatar
Vectose
Forum Moderator
Posts: 3947
Joined: Sun Nov 28, 2010 8:45 pm
Location: Newcastle

Re: I've done a DIY respray and colour change

Post by Vectose »

To get a good finish you gotta wet sand it then cut it. You'll be there forever if you try and buff out the orange peel.
Bennoz wrote:
Technikhaus wrote:What is in said Bens big penis by the way?
A whoooole lot 'o jism 8)
Rob Furniss
Oldtimer
Posts: 1394
Joined: Wed Jan 19, 2011 11:32 pm
Location: Perth
Contact:

Re: I've done a DIY respray and colour change

Post by Rob Furniss »

Vectose wrote: Tue May 15, 2018 4:59 pm To get a good finish you gotta wet sand it then cut it. You'll be there forever if you try and buff out the orange peel.
Ok thanks for the tip Rob, i'll get sanding tonight if I get chance - 2000 then 2500 then a cut?
User avatar
Vectose
Forum Moderator
Posts: 3947
Joined: Sun Nov 28, 2010 8:45 pm
Location: Newcastle

Re: I've done a DIY respray and colour change

Post by Vectose »

Probably start at 1500 then 2000. A decent cutting compound should get rid of 2000 scratches. Also don't use a dual action or orbital polisher, they're no good for cutting.
Bennoz wrote:
Technikhaus wrote:What is in said Bens big penis by the way?
A whoooole lot 'o jism 8)
User avatar
getonit
Grease Monkey
Posts: 274
Joined: Fri Sep 11, 2015 1:26 pm
Location: In Toukley, with ya mum.

Re: I've done a DIY respray and colour change

Post by getonit »

Will assume this is acrylic, great paint to learn on as it's fairly forgiving. Bad paint if you want to step up to 2K later. Acrylic is a weak paint that never truly cures and does not like 2K over the top. If it does not craze or split sometime down the track it will delaminate. Keep that in mind.
Obviously you are going to cut and buff to get gloss, depending how much peel you have which being acrylic should be minimal. As Vectose said 1500 then 2000 will suffice. Sheepskin pad with buff compound first up then appropriate foam pad and something like meguiars medium cut cleaner then polish. Don't forget to wash in between.
Use a firm rubber block for flat and a soft block for the curves, wet sanding please.
Image
Post Reply