First thing acquire a 6A13TT engine ...

New cambelt, pulleys and waterpump ...

A £1.50 worktop clamp does the trick perfectly as a cam-locking tool ...

Move this little puppy to the boot ...

Take this big puppy out of the engine bay ...

Makes sense to respray the engine bay whilst its bare ...

Relocate the brake distribution block ...

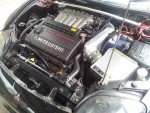
And let the new block see its home for the first time ...

Bulkhead pushed back a touch to acommodate the rear turbo ...

The wiring nightmare begins. I kept the GPX loom in there and just added a few bits from the VR4 loom ...

I'm going to try this ghetto method first of stiffening the engine mounts to limit movement. Using Polyurethane Sealant (Tiger Seal was my choice) to 'thoroughly' fill in the voids on the front and rear gearbox mounts. If I need them to be even stiffer I will get nylon jobbies made up instead but this should do the trick ...